This page is dedicated to strategies involved in building differently themed bases.
General Information
Each base design in Jungle Heat revolves around the idea of successfully warding off attackers. There are many different types of base designs in Jungle Heat, each with its own pros and cons.
Objectives of Good Base Design
- Protect the Command Center
- Protect the Resource Buildings
- Successful Base Defense
General Base Building Strategy
For more information on defending a base, see Base Defense.
For information on building upgrades, see Base Upgrading.
Buildings
Each building on your map has a priority level associated with it.
High Priority Buildings
- Command Center
- Full or Filling Storage Buildings
Low Priority Buildings
- All Defense Buildings
- Gold Mines
- Oil Rigs
Non-Priority Buildings
- All Army Buildings
- Clan HQ
- Empty Storage Buildings
Base Types
Box Base
The Box Base is the most common type of base, especially at lower levels where a limited number of walls are available. This base is the simplest of all bases and the easiest to defeat.
The Box Base works on the basic principle that troops will take the path of least resistance when choosing buildings to target. This base generally has one large wall that encloses all of the high priority targets and puts the remaining buildings outside of the inner wall. The inner wall is often surrounded by an outter wall, with lesser building inbetween the two. Attacking units take the shortest path when choosing targets. This will sometimes lead units to attack walls even though there is a destroyed section a short ways away. If the base is built right, the troops will destroy the outside layer of buildings and then move to the first layer of walls while the towers on the inside fire at them. Troops will continue to move in a circular motion, destroying buildings in the first layer, while the inner watchtowers fire at them.
Building a Box Base
Building a Box Base can be extremely easy or considerably difficult depending on how many buildings you are trying to protect and their priority level. Start by placing your Command Center as close to the center of the map as possible. Next, decide how large of an inner box you would like to create. A common amount of buildings in the inner box is 12 plus the Command Center, arranged in a 4x4 square with the Command Center in the middle of the buildings. Now decide if you would like a double thick or single inner wall and surround the first box accordingly. Next, surround the first box with lower priority buildings and enclose those buildings with another wall. Lastly, surround the outside layer of walls with non-priority buildings.
Tips:
- Never use the edge of the map as a wall. The edge of the map does not count as a barrier and attacking troops can be place off the map for easy access to your base. Troops will also walk around the edge of your wall and into your base if you try to use the edge as a barrier.
- Building a double thick wall on the inner box will help against Gunners. They will choose a closer target if one is nearby, instead of moving toward the inner section.
- Place Defensive Buildings in the inner wall, along with other high priority buildings.
- Evenly space Defensive Buildings in the second layer of walls. Staggering buildings will cause Gunners to go for those buildings, rather than destroy the walls to the inner box.
- Do not protect all of your storage buildings. Each storage building fills up with resources before the next one is used and fill in the same order each time. If you have two level 11 Gold Storage buildings, then you can collect up to four million gold before the third storage even starts filling. There is no point protecting an empty storage.

Box Base.
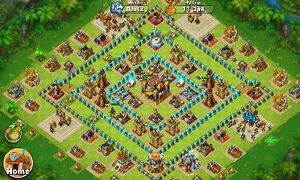
Box Base
Quadrant Base
The Quandrant Base is less common than the Box Base. It is more complex and takes a greater number of walls to construct, and therefore requires a higher level Command Center. This base is harder to defeat than the Box Base, and attackers often fail to destroy the Command Center.
The Quadrant Base works on the principle that attacking ground troop speed will be slowed by walls, giving the defenses ample time to kill them. This base is generally classified by many small sections, or quadrants, that have been sectioned off by walls. The size of the quadrants is up to the builder, but generally consists of 1–3 buildings each. This base is normally symmetrical, with the Command Center in the middle of the map and each quadrant being built out from the center.
Building a Quadrant Base
Building a Quadrant Base is slightly more complex than building a Box Base. However, the added difficulty will be rewarded by a higher defensive success rate. Start by placing your Command Center as close to the center of the map as possible and surround it by a wall. If the Command Center is placed off center then you may run out of map while building your base and have to do a number of shifts to make everything fit. Next, determine the size of the inner layer of quadrants and begin by placing higher priority buildings outside of the first set of walls. Surround these buildings by walls and continue building outward.
Tips:
- To avoid running out of map, try and place your Command Center as close to the center as possible.
- The Quadrant Base is high customizable. Some bases feature Cannons, Watchtowers or Death Rays close to, or with the Command Center for increased protection. Some bases also feature larger than 3x3 quadrants for trap and Defdrone placement.
- If you don't have enough walls to enclose every building in its own section, then consider creating larger sections with two or three buildings. These sections can always be redesigned later when you have more walls to play with.
- Always try build out, at least, two quadrants from the Command Center. The more walls you have between the Command Center and the edge of your base, the more walls attacking troops will have to go through to get an automatic win.
- If you're like me and have trouble imagining what the base will look like, then it may be easier to move your walls to the edge of the map and begin by building one layer at a time. I often start with the center quadrant, build out the N, S, E, and W sides first and then fill the inner sections.

Quadrant Base

Quadrant Base
Diamond Base
The Diamond Base is even less common than the Box or Quadrant style bases. This base is the most complex to build sucessfully and takes the greatest number of walls. The Diamond Base is even harder to defeat than the Quadrant base and attackers often fail to destroy 50% of the base. The inventor of the Diamond Base is unknown. However, the first known user of this base style was Nasir, the global leader for several months before abruptly leaving the game.
The Diamond Base works on the principle that spreading buildings out in an oblong shape will delay attacking troops enough for defensive buildings to destroy them. This base is generally characterized by four main sections radiating out from the center to the NW, W, SE and E.
Building a Diamond Base
Diamond style bases vary greatly in size and wall structure. The inside structure may consist of simpy the Command Center or may include defensive and resource buildings. Building this style base can be time consuming, so be patient! Start by placing your Command Center as close to the center of the map as possible. You may either surround the Command Center with a wall or add defense buildings and then surround with a wall. From this starting point, you may build in any direction. I find it easiest to build to the NW first and then the SE. Starting at the NW tip of the Command Center, place three buildings in a triangle shape, with the tip pointing to the NW, and surround with walls. Do the same with the SE corner of the Command Center. From this point you may either create a square or triangle shaped sides pointing towards the E and W. At this point, you should have a complete second layer in your base. Continue to pattern to add a third layer.
Tips:
- It is exremely easy to run out of map while building this base if the Command Center is not centered. You should also plan where to put your Rally Points because there may not be enough space inbetween the edge of your base and the edge of the map once everything has been built.
- The Diamond Base is highly complex and customizable. It is not uncommon to configure and reconfigure your base a few times after the initial build. Whenever someone successfully defeats your base, watch the replay and see how they did it and adjust accordingly.
- The center structure will determine the width of your diamond.
- Try and build at least two chevrons from the center outward in every direction. This will give you enough walls from the Command Center to slow ground troops down significantly.
- Staggering your outside wall joints will give you greater protection from bombs.
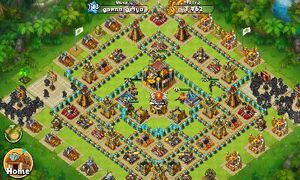
Diamond Base

Diamond Base

Diamond Base 3

Diamond Base 4
Notes
This strategy guide was created by Ogre13 .
- I have personally used every base discussed in this topic.
- I have no affiliation with any pictures, names or clans discussed in the description of the base design types.
- My current base is a Diamond Style base. I have been using this base since January 2014. As of 5/1/14, my base has above a 95% successful defense rating and it has never been defeated to 3-Stars.
| Buildings | |
|---|---|
| Army | Barracks · Comcenter · Briefing Center · Lab · Special Forces · Rally Point · Workshop |
| Defense | Airship Bomb · Air Torpedo · Big Bada Boom · Cannon · Death Ray · Defdrone · Dynamite · Flame Tower · Jericho · Lightning Gun · Mortar · SHIELD Generator · Spider Gun · Trap · Wall · Watchtower |
| Resource | Gold Mine · Gold Storage · Oil Rig · Oil Storage |
| Other | Clan HQ · Command Center · Decorations · Obstacles |